Showing posts with label For the Wall. Show all posts

Tuesday, September 4, 2012

Wall Flower

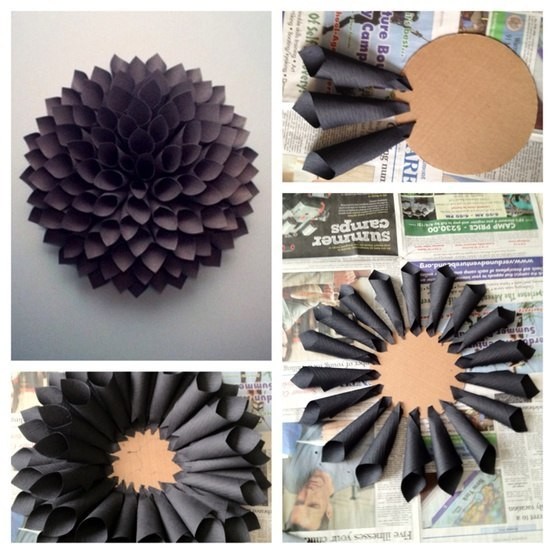
I figured out how to do this craft from this pin: Dahlia

This project was so much easier than I expected. I thought I would be rolling paper cones for hours but I had the entire thing done in about two hours! I had been waiting for over a week to find the time to do this, so last Friday once the house was all cleaned and I finally got both kids to take a nap at the same time, I knew it was finally the right time for this craft. I pulled out my old copy of Les Miserables, turned on my guilty pleasure show (The Bachelor Pad), and I started rolling paper. I used my old copy of Les Miserables because I had dropped it in the lake over 12 years ago and the edges were yellowed and I knew I wouldn't be reading this copy again. I also like the paper size, 4x7. I rolled about 100 cones. Sometimes when I focused on rolling I seemed to mess up, really its just a simple mindless roll, fold the edge up, roll the extra paper around to form the cone, then unroll the edge and apply glue and finish the fold. I used about 15 mini hot glue sticks for this.

 Once I had about 100 cones I cut out a piece of cardboard. I used my 16 inch cake pan and traced the circle, I cut out two circles and glued them together so it was a little more sturdy. Before I began to glue the cones on I poked two holed on opposite edges and tied a string along the back of it so that I could hang it when it was done. Then I began gluing on the cones. I was not looking at the pin when I did this so instead of gluing the tips to the board I just glued along the back of the cone with only about two inches of the cone hanging off. I also started placing the cones too close together so after about six cones that were side by side I started leaving about a 1/2 inch in between. As I began to glue on the inner layers I continued to glue the back of the cones and just glued them on top of the other cones so I really only glued the very first layer to the cardboard.
After gluing the third layer around I was having a little trouble with the tips of the cones getting in the way so the top part wasn't laying flat. So I just cut the tips of the cones off and placed the cone to sit where I wanted it to. I was worried at first because I could see through the cone and the cardboard was showing but then as I squished more cones into the middle the holes closed up.
 
As I was finishing up there no longer were rows of cones I really was just squeezing them into the middle part where ever it needed it and in the end I don't know that you can really go wrong, its just fun to look at!
On a tricky scale of 1-10 I give this a 2, I was pleasantly surprised at not only how easy it was but how quickly I was able to finish it. And with a fun show on in the background it didn't even seem that tedious!

Friday, August 24, 2012

Buttons

These are the pins that inspired this project The Button Letter and The Button Tree


I was hoping for a tutorial with a template for the button tree, but it was just a picture, still it was good enough. I wish I could give out a template for a button tree but I don't have one I just free handed it and up close it looks a little thick and sloppy.

I was trying to do this project as cheap as possible. I bought two big bags of pastel buttons and ribbon. I had some leftover bead board in the garage and thought it would be a nice background so I had my husband cut 2 16x16 pieces and I painted them white. For the M I folded a 12x12 piece of scrapbook paper and using a ruler made the best half of an M that I could, then I cut it out and unfolded it to reveal a really big M. I traced it onto the board, plugged in the glue gun, grabbed a handful of gluesticks and got to work. I placed most of the buttons before I started glueing. Once I liked the look, I started glueing. I put a second layer of buttons to cover up the gaps. To be honest I didn't love this project. I feel like my M was way to big and it just looks so much better in a nice shadowbox frame like the original pin I also noticed that she didn't use just buttons, there are beads and other items on her letter and I like the bolder colors. Oh well whats done is done, and I was done. I drilled holes at the top and looped a ribbon through to hang it and then I glued ribbon all around the edge.
For the tree I just free handed the tree and painted it black. If I were to do it again I wouldn't paint it, I would use a sharpie to color it. The paint got sloppy and so my branches got thicker and thicker, and it needed at least two coats to cover it good so I ended up going over most of it with a sharpie in the end to smooth it out and finish off the curlz on the branches. I feel like it would have looked much more clean if I bagged the paint. After the tree was done I just went crazy with button blossoms, maybe a little too crazy!I put a ton of buttons on it, but it never looked full and right and I am just now realizing that the original pin used bigger buttons. I may just make a few adjustments to my finished tree...
I just got a little wooden M and painted it to put under the tree, not as cute as a fancy painted M but much easier!
When I hung these up at first they were on separate walls and I wasn't crazy about either of them, but since I just moved Maggie into the smaller room and hung them on this shelf above her crib I find that I am much happier with the results of this project!


On a easy/hard scale of 1-10 I give this project 3.5, except for drawing the tree, that was a 6 but still most anyone on any craft level could handle this, it just doesnt turn out as beautiful as the original pins!
Awesomeness

This is the pinterest post that inspired this project...
This may be one of my favorite Pinterest Projects so far! We have been a little obsessed with How I Met Your Mother on Netflix lately, and though this isn't an exact quote from Barney Stinson, I believe he says "whenever I am sad, I stop being sad and be AWESOME instead", it is still a quote that makes me happy every time I see it.
I started by taking some extra wood that was for our fence but had been laying in the grass for the past several years. It was a little ant infested and it took a couple days of washing and brushing to completely get rid of the ants. I do like how there are a couple of rotted ant tunnels on my board though. I got out my husbands saw and for the first time ever cut the boards myself. I cut 6 boards 31 inches tall, it is crazy how hard it was for me to make a straight cut on a 4 inch board! It kept curving at the end but I figured that some of these imperfections would only make the board more awesome! After I lined the boards up I cut two more boards to drill perpendicular on the back to hold it all together. I thought one screw on each board would be okay but the boards still shifted so I added two screws to each board. I told my super crafty friend Melissa that I would make her a big board if she would make a stencil on her Cricut machine, I think I totally got the easy job! Each word was its own stencil so we lined them up on the board and taped it all together in hopes that we could transfer it to the next board. I rolled over all the letters very carefully and when it came time to remove the stencil we discovered that the paper had stuck to the paint so we had to tear it off and ruin the stencil, boo. But my board looked AWESOME!! We ran a sander over the entire board and roughed up all the edges and high spots pretty good, and wa la, here it is!
I felt bad that I ruined the stencil Melissa had made, but she decided to take a different approach, she cut out the letters on her Cricut and modge podged them onto her board, it turned out super cute. She did two of each letter and created a sort of shadow effect, the picture doesn't do it justice!
The best part about this project was that we used boards that were just rotting in my yard, screws I found on my husbands work table, leftover house paint, scrapbook paper that we always have on hand, and sponge rollers and paintsticks that I already had. The only thing I had to buy was a hanging kit that was less than $2!! On a crafters scale of 1-10 I give this project a 7.5, Making the board was easier than I expected but unless you have a Cricut and know how to use it, or unless you have an uber talented friend willing to make the stencilfor you, I don't even know how one would pull it off... but it could be Awesome to try! :)