Wednesday, September 19, 2012

Monster Jars

I loved these cute jars from this pin: Monster Jars
 
I was "organizing" my cupboard the other day and I had two jars that just kept getting in the way, and then I saw that I had green and white acrylic paint and I thought of these jars. I opened up one jar and squeezed in some green paint. Then I put the lid on and shook the jar until the jar was all green. Then I logged onto Pinterest, pulled up this pin, and read the instructions on how to get the black faces on. Well once again I learned that I need to read the pin before I start the craft! She didn't use paint for this project, she modge podged tissue paper to the outside of the jar and then she modge podged the faces on, and then she can put a votive in the jar. Weeellll I had already started and I didn't have any tissue paper that wasn't pink so I just decided to go with the paint. I put the white paint in the other mason jar, shook it till it covered and then I found a smaller jar for my orange pumpkin. I didn't have orange acrylic paint so I used my sons crayola washable paint and it is holding up okay. In case you are wondering, painting the insides of jars with leftover house paint didn't work for me, it looked good for three days but then it just separated and dried out funny and one day I looked at the jars and they looked really bad, it was a shame. Anyways, once the insides of the jars were colored I grabbed a black sharpie and started to draw on the faces. I copied how hers look because they are darling, but I didn't use her template because I was lazy. But if you don't feel comfortable drawing on the faces she has a cute template you can print out for the faces. Now because I painted the insides I don't know if light will shine through as well. I definitely won't be putting a candle in them but maybe I will pick up a few battery votives and try it out. Also I need a bit of ribbon for the lids.  But for now they just sit on my shelf looking Halloweenie and I am just fine with that!
 
 
On a tricky scale of 1-10 these get a 1. So So easy and quick and if you use her stencil your jars can look just as cute as hers!

Monday, September 17, 2012

Dino Dress Up


I fell in love with these pins last year: Dino Tail and Dino Hoodie

I really wanted to make these for Cooper last year for Halloween and after reading the Tail Tutorial it seemed doable. It is always interesting when I pull out the sewing machine but once the spikes were sewn it really wasn't too bad. Mine definitely don't look as nice but it works. I made a few changes in mine. For the tail I used an elastic waist band and made it scrunchy style (I became somewhat of an expert scrunchy maker during my high school sewing classes). I attached the kind of clasp they use on dress pants, I don't know what it is called but I used a couple different hooks to clasp it to so that he can wear it for a few years. For the Hoodie I was not very confident in my patience for hand stitching so I make a set of spikes like I did for the tail, I cut the hoodie in half and I just sewed it all together, it doesn't look near as nice but it worked. Maybe in the future I will make a better one and when I do I am going to use a stiffer felt or fabric for the spikes or I am going to stuff them with batting so they stand up more.
 I hot glued on some eyes for Halloween but I peeled them off afterwards so that he could wear the hoodie on a more day to day basis because I thought it was so cute and call me crazy but I like to see kids dressed up as part animals on a day to day basis, it adorable.
 This is nearly a year later and Cooper still loves the dino outfit, maybe I can starch the spikes...
 
This is how it looked after I cut it in half and sewed it back together, my sewing skills are embarrassing but no one really sees this part anyways...
On a difficulty scale of 1-10 I would give it a 7. Anytime I have to pull out the sewing machine it automatically  adds a few difficulty points because I just don't sew very well, however the tutorial are amazing and made it fairly easy, especially if you love to sew (I'm guessing).


Friday, September 14, 2012

Lesson Learned

I saw this pin and was super excited to make this Pumpkin Treat on this crisp cool day.
The description underneath the pin said this-
Pumpkin Frozen yogurt: 1 Cup Greek yogurt, 1 cup pumpkin puree, 1 T. Sugar, 1 t. pumpkin pie spice. {substitute pure maple syrup for sugar}
Easy enough, and I had all the ingredients!! Without even clicking the pin to take me to the link of instructions, I started mixing everything together. I figured I would just mix all the ingredients and put it in the freezer and in a few hours enjoy my delicious skinny treat. As I was stirring it just didn't look right. It wasn't pale orange and smooth. It looked a little curdly and no matter how fast I whisked the yogurt wasn't smoothing out. This is the part where I learned an important lesson as I clicked on the pin to take me to the link for instructions. The first problem was that you need an ice cream mixer to make this, however I had seen somewhere that you can put the mixture in a Ziploc and freeze it and every 30 minutes squish the bag and mix and mix. So I thought I would still give it a whirl. I got out my immersion blender and gave it a good blend to get it nice and creamy. I pulled the blender out, licked it clean and discovered my second problem. The recipe on the website calls for non fat vanilla yogurt. The description under the pin calls for Greek yogurt. The two are not the same at all, I thought the Greek yogurt would give it a subtle zip and would pair well with the pumpkin, like pumpkin and cream cheese. Not so. The Greek yogurt made the mixture too too tart and it just didn't go well together in my opinion, and I am a huge fan of Greek yogurt so I was disappointed. I still wanted to freeze it and see if it was better frozen. I don't know if Greek yogurt freezes differently than plain vanilla yogurt or if it was my method of freezing without an ice cream mixer but it just comes out a little on the icy side and not so creamy, and the tartness was still overpowering. All was not lost. I mixed the pumpkin yogurt with a big ol' scoop of vanilla ice cream, blended it with a touch of milk and had myself a tasty not so skinny shake.
For the future ALWAYS click on the link for the correct ingredients and instructions, I think I would have really liked this treat, maybe in the future... once I get an ice cream maker.
I can't rate this on a scrumptious scale because I blew it but I am sure that it is delicious when made correctly!

Tuesday, September 11, 2012

Caramel Apples

There is no pin for this. So maybe I am cheating a little bit crafting something I didn't see on pinterest. I actually was looking for a pin to learn how to do this last year and when I couldn't find one I asked my craft hero Melissa if she could teach me how to make these. It is so simple its ridiculous.
 
You will need:
Fake Apples, what ever color you choose
Sticks, I used tree branches but craft sticks, lollipop sticks, striped straws are all cute too.
 Tacky Glue, its in the craft stores in the gold bottle
Acrylic Paint, we used a color from Walmart called Cinnamon
Ribbon
 
Bore a hole in the top of the apple for your stick. Don't make it too big, just big enough so that you can shove the stick in. You can secure it with glue if it isn't holding tight.
To make the caramel put the Tacky Glue into a cup and add the paint until it is a nice caramel color. I wish I could say how much of each but it just needs to be eyeballed.
The caramel can either be drizzled like I have done or it can be dipped like a traditional caramel apple. If you choose to dip it you want a wider bowl for the glue mixture and you will need more glue mixture to dip into,  but if you want to drizzle it you can just mix the glue and paint in a paper cup and you will just need probably about 1/4-1/2 cup. To drizzle it on just pour the caramel around the stick and let it do its own dripping. The caramel will drip down a lot so you don't after the top 1/5-1/4 of the apple is covered. Put the apples on a plastic baggy (I prefer the freezer ziplocks that are a thicker plastic but just make sure you put the apple on the back of the bag and not on the label part) . Watch it for a few minutes, if it isn't drizzling like you want you can pour a little bit where you want the drizzle and as it drips down it will blend. If you choose to dip the apples dip them in the glue, you may need to roll the apple in the paint so that the caramel reaches as high as you like. Hold the apple so that it can drip off and after the bulk of the paint has dripped scape the bottom of the apple off on the edge of the bowl and place it on a plastic baggy to finish dripping and drying. The Apples need to drip and dry overnight. Once they are dry attach any ribbon you want to. We thought about coloring some glue a chocolate brown and doing brown and white chocolate looking dips or drizzles but decided not to but you can go as crazy as you'd like. I don't know if sprinkles or candies would hold up or get super gross but that could be fun too.
I did say these were simple, but its more because it is just glue and paint on an apple. There is a little bit of trickiness in getting the glue just right with the drizzle and dripping. Just remember that it may not look right but it drips a lot. On a tricky scale of 1-10 I give this about a 3.5, easy enough to tackle and you feel like a crafty rock star afterwards.

Friday, September 7, 2012

Banana Cake Bars

 I got this yummy yummy recipe from this pin: Banana Bars
We had some guests over for dinner on Wednesday. Over the weekend a nasty stomach bug came for a visit so by Wednesday I was craving some serious comfort food. I wanted cheesy soups and fall desserts, but I just couldn't bring myself to make Autumn weather food when it was 100 degrees out. So I made a chicken broccoli cream dish over rice and these banana bars. I fell in love a little bit. These are so good!! I made half of the recipe and baked it in a 7x11 glass dish. Then I made half of the browned butter icing and poured it over the top. Next time I will half the bars but make the whole icing recipe. The icing is so goooood!! I am sad to say that I have not browned butter since I was in culinary school! Shame on me, I have really missed out! I had forgotten how good browned butter smells and the taste of this icing! Oh man it's a little nutty and oh so buttery and sweet and pairs perfectly with the banana bars. And now to give some credit to these bars, it is banana bread taken to the next level of deliciousness. It has the texture of a really good Texas sheet cake. Not as dense as a banana bread and I like that. I made these in the morning and as soon as the icing had set up enough to cut without drizzling I tasted it. It was warm and delicious and I felt happy. Later that night when we had them for dessert I was a little disappointed because I didn't love it as much as I had earlier. But then I popped it in the microwave for 12 seconds and I was back in my happy place! Eat these warm! Part of what makes me happy when I eat these is that I feel like its the perfect bridge dessert between summer and fall. Living in Texas we miss out on the crisp fall weather and the leaves changing. Its hard for me to get excited about soups and pumpkin treats when its sunny and in the 90's, but this is kind of summery and fallish at the same time, so its great for a warm September treat.
I almost forgot to snap a picture as I sat down to eat the last piece for breakfast!!
On a scale of 1-10 this gets a 9 for Yummers and is about a 4 for difficulty to make only because she isn't lying when she says browning butter can go from nice and brown to burnt in seconds. It can be hard to see the color of the butter because the butter fat sits on top as its boiling. You will start to know it's ready by the smell. It will start to smell very buttery and a little nutty, check the color then. It should be a nice golden brown. I had the milk and vanilla in a little bowl on the side to pour in immediately to cool down the browning process as soon as it was ready.

Tuesday, September 4, 2012

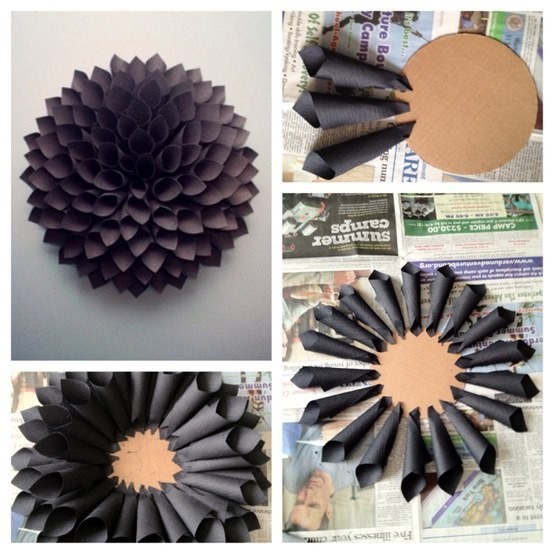
Wall Flower

I figured out how to do this craft from this pin: Dahlia

This project was so much easier than I expected. I thought I would be rolling paper cones for hours but I had the entire thing done in about two hours! I had been waiting for over a week to find the time to do this, so last Friday once the house was all cleaned and I finally got both kids to take a nap at the same time, I knew it was finally the right time for this craft. I pulled out my old copy of Les Miserables, turned on my guilty pleasure show (The Bachelor Pad), and I started rolling paper. I used my old copy of Les Miserables because I had dropped it in the lake over 12 years ago and the edges were yellowed and I knew I wouldn't be reading this copy again. I also like the paper size, 4x7. I rolled about 100 cones. Sometimes when I focused on rolling I seemed to mess up, really its just a simple mindless roll, fold the edge up, roll the extra paper around to form the cone, then unroll the edge and apply glue and finish the fold. I used about 15 mini hot glue sticks for this.

 Once I had about 100 cones I cut out a piece of cardboard. I used my 16 inch cake pan and traced the circle, I cut out two circles and glued them together so it was a little more sturdy. Before I began to glue the cones on I poked two holed on opposite edges and tied a string along the back of it so that I could hang it when it was done. Then I began gluing on the cones. I was not looking at the pin when I did this so instead of gluing the tips to the board I just glued along the back of the cone with only about two inches of the cone hanging off. I also started placing the cones too close together so after about six cones that were side by side I started leaving about a 1/2 inch in between. As I began to glue on the inner layers I continued to glue the back of the cones and just glued them on top of the other cones so I really only glued the very first layer to the cardboard.
After gluing the third layer around I was having a little trouble with the tips of the cones getting in the way so the top part wasn't laying flat. So I just cut the tips of the cones off and placed the cone to sit where I wanted it to. I was worried at first because I could see through the cone and the cardboard was showing but then as I squished more cones into the middle the holes closed up.
 
As I was finishing up there no longer were rows of cones I really was just squeezing them into the middle part where ever it needed it and in the end I don't know that you can really go wrong, its just fun to look at!
On a tricky scale of 1-10 I give this a 2, I was pleasantly surprised at not only how easy it was but how quickly I was able to finish it. And with a fun show on in the background it didn't even seem that tedious!

Thursday, August 30, 2012

Work Outs

Got some great work outs from these pins: Treadmill Run, Killer Kardio, Arms, 30 MinTreadmill, I couldnt link to all the pins because many of them were just photos with no links.
After having a baby I found myself pinning a TON of different work outs and healthy recipes to motivate me get back in shape. There were some really great and inspiring blogs and some super fun looking work outs, I was excited, BUT.... For me the problem with pinning a workout was that in order for me to remember what I needed to do I needed to pull up pinterest to find the pin. Too often I just got sucked into pinterest and before I knew it I no longer had time to work out. As a solution to my pinterest addiction coming in between me and my workout I just typed out a few of my favorite workouts so I can keep these cheat sheets on my treadmill and get my workouts done. I don't know how to upload a link to a file so here is the list of my favorite works outs. Check out the blog links because they are full of fun workouts and recipes and motivation!

Beginners Treadmill Work Out From ittybitsofbalance.com
Minutes                 Speed
1-3 min                  3
3-5 min                  3.5
5-7 min                  5.5
7-8 min                  3.5
8-10 min                6
10-11 min               3.5
11-13 min               6.5
13-14 min               3.5
14-16 min               6
16-17 min               6.5
17-20 min              3.5
 
Intermediate Treadmill Work Out from ittybitsofbalance.com
Minute               Speed
1-3 min               3
3-5 min              3.5
5-9 min              6
9-10 min             3.5
10-14 min            6.5
14-15 min            3.5
15-19 min            6.7
19-20 min           3.5

 Advanced Treadmill Work Out from ittybitsofbalance.com
Minutes            Speed
1-3 min            3
3-5 min            3.5
5-8 min            6.5
8-9 min            7
9-10 min          3.5
10-13 min         6.7
13-14 min         7.2
14-15 min         3.5
15-18 min         7
18-19 min         6.5
19-20 min        3.5

 Minka Kelly’s Crazy Treadmill Work Out from shape.com
1 minute at 5.0
1 minute at 5.5
1 minute at 6.0
1 minute at 6.5
1 minute at 7.0
1 minute at 7.5
1 minute at 8.0
2 minutes at 4.5
 Repeat 5 times or however many times you have the strength and energy to do!!
 
Killer Kardio from fantasmo.blogspt.co.uk
Jump Rope       1minute
High Knees      1minute
Butt Kicks       1minute
Burpees           20
Run 10 minutes
Repeat but substitute Burpees with 10 Push Ups and 10 Triceps
Repeat Set one and add 1 minute of Mountain Climbers

30 Minute Treadmill Workout from pbfingers.com
Minutes                   Incline                     Speed
0-5                           6                              4
5-7                           1                               7
7-9                           8                              4
9-10                         1                               8
10-11                         1                               4.5
11-11:30                     1                               10
11:30-14                    1                               4.5
14-16                        1                               8
16-18                        1                               4.5
18-19                        1                               9
19-20                       1                               4.5
20-20:30                  1                               10
20:30-22                  1                               4.5
22-24                       1                               8
24-26                       1                               4.5
26-27                       1                               9
27-28                       1                               4.5
28-28:30                  1                               10
28:30-30                  1                               4.5

Strength and Cardio Combos
The 100 Workout (I LOVE THIS ONE!)
100 Jumping Jacks
90 Crunches
80 Squats
70 Leg Lifts (35 each leg)
60 Jumping Jacks
50 Crunches
40 Squats
30 Leg Lifts (15 each leg)
20 Jumping Jacks
Run for 10 minutes

The Ninety and Nine Workout
99 Jumping Jacks, 99 Crunches, 99 Leg Lifts,
99 Second Wall Sit, 9 Push-ups.
Repeat with 88 of each, 77, 66, 55, 44, 33, 22, and finish with an 11 minute run…
This is a little too intense for me. I start with the run and work my way up in hopes that one day I can make it. I also do a variety of sit ups and since I am not really sure what type of leg lift workout is intended I do a variety of those as well. Easy to remember and mostly fun.

STRENGTH/TARGET AREAS

Thigh Pyramid Workout: Repeat this 3 times
10 Split Leg Squat on Each Leg
20 Regular Squats
30 Lunges on each Leg
40 Toe Touches
50 Second Wall Sit
100 Jumping Jacks
50 Second Wall Sit
40 Toe Touches
30 Lunges on Each Leg
20 Regular Squats
10 Split Leg Squat on Each Leg

Nice Legs
20 Squats
30 Lunges
40 Calf Raises
50 Second Wall Sit
100 Jumping Jacks
50 Second Wall Sit
40 Sumo Squats
30 Leg Raises
20 Squats

Sculpted Toosh
50 Squats
30 Walking Lunges
20 Jump squats
30 Side Lunges
50 Bridges
Repeat 3 Times

Arms… from lifeisblyss.com
60 Second Plank
15 One-Armed Rows
15 Chest Press
15 Seated Shoulder Press
15 Flys (laying on back)
15 Reverse Flys (laying on ball)
15 Lateral Raises
15 Chest Press (on ball)
15 Triceps dip (on bench)
15 Alternating bicep curls
15 Lying row and Rotation (on ball)
15 Chest Press (on ball)
15 Reverse Flys (on ball)
15 Laying Triceps Extensions
60 Second Planks

Dont let this happen to you!