I figured out how to do this craft from this pin:
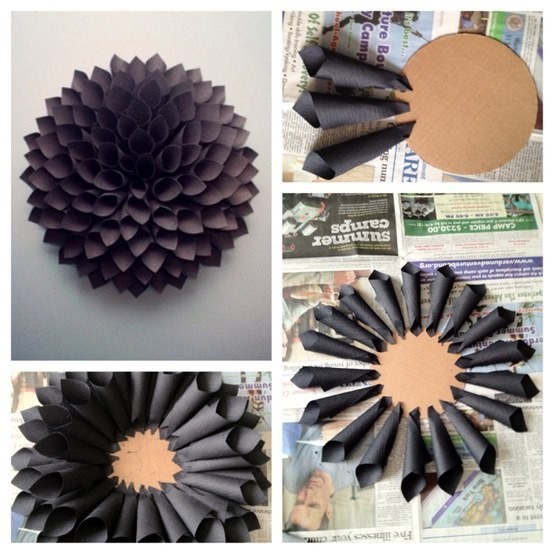
Dahlia

This project was so much easier than I expected. I thought I would be rolling paper cones for hours but I had the entire thing done in about two hours! I had been waiting for over a week to find the time to do this, so last Friday once the house was all cleaned and I finally got both kids to take a nap at the same time, I knew it was finally the right time for this craft. I pulled out my old copy of Les Miserables, turned on my guilty pleasure show (The Bachelor Pad), and I started rolling paper. I used my old copy of Les Miserables because I had dropped it in the lake over 12 years ago and the edges were yellowed and I knew I wouldn't be reading this copy again. I also like the paper size, 4x7. I rolled about 100 cones. Sometimes when I focused on rolling I seemed to mess up, really its just a simple mindless roll, fold the edge up, roll the extra paper around to form the cone, then unroll the edge and apply glue and finish the fold. I used about 15 mini hot glue sticks for this.


Once I had about 100 cones I cut out a piece of cardboard. I used my 16 inch cake pan and traced the circle, I cut out two circles and glued them together so it was a little more sturdy. Before I began to glue the cones on I poked two holed on opposite edges and tied a string along the back of it so that I could hang it when it was done. Then I began gluing on the cones. I was not looking at the pin when I did this so instead of gluing the tips to the board I just glued along the back of the cone with only about two inches of the cone hanging off. I also started placing the cones too close together so after about six cones that were side by side I started leaving about a 1/2 inch in between. As I began to glue on the inner layers I continued to glue the back of the cones and just glued them on top of the other cones so I really only glued the very first layer to the cardboard.

After gluing the third layer around I was having a little trouble with the tips of the cones getting in the way so the top part wasn't laying flat. So I just cut the tips of the cones off and placed the cone to sit where I wanted it to. I was worried at first because I could see through the cone and the cardboard was showing but then as I squished more cones into the middle the holes closed up.
As I was finishing up there no longer were rows of cones I really was just squeezing them into the middle part where ever it needed it and in the end I don't know that you can really go wrong, its just fun to look at!
On a tricky scale of 1-10 I give this a 2, I was pleasantly surprised at not only how easy it was but how quickly I was able to finish it. And with a fun show on in the background it didn't even seem that tedious!


No comments:
Post a Comment